Posted on Leave a comment

Bottled Strawberries

Bottled strawberries

With a glut of British strawberries this summer we’ve taken great delight in having an ‘excuse’ to support local strawberry farmers and go ‘pick your own’ing.

Well, with me, hubby and three children able to pick (the 3 month old is probably just too young…next year for him)…you can imagine that of course we came home with more than we needed.

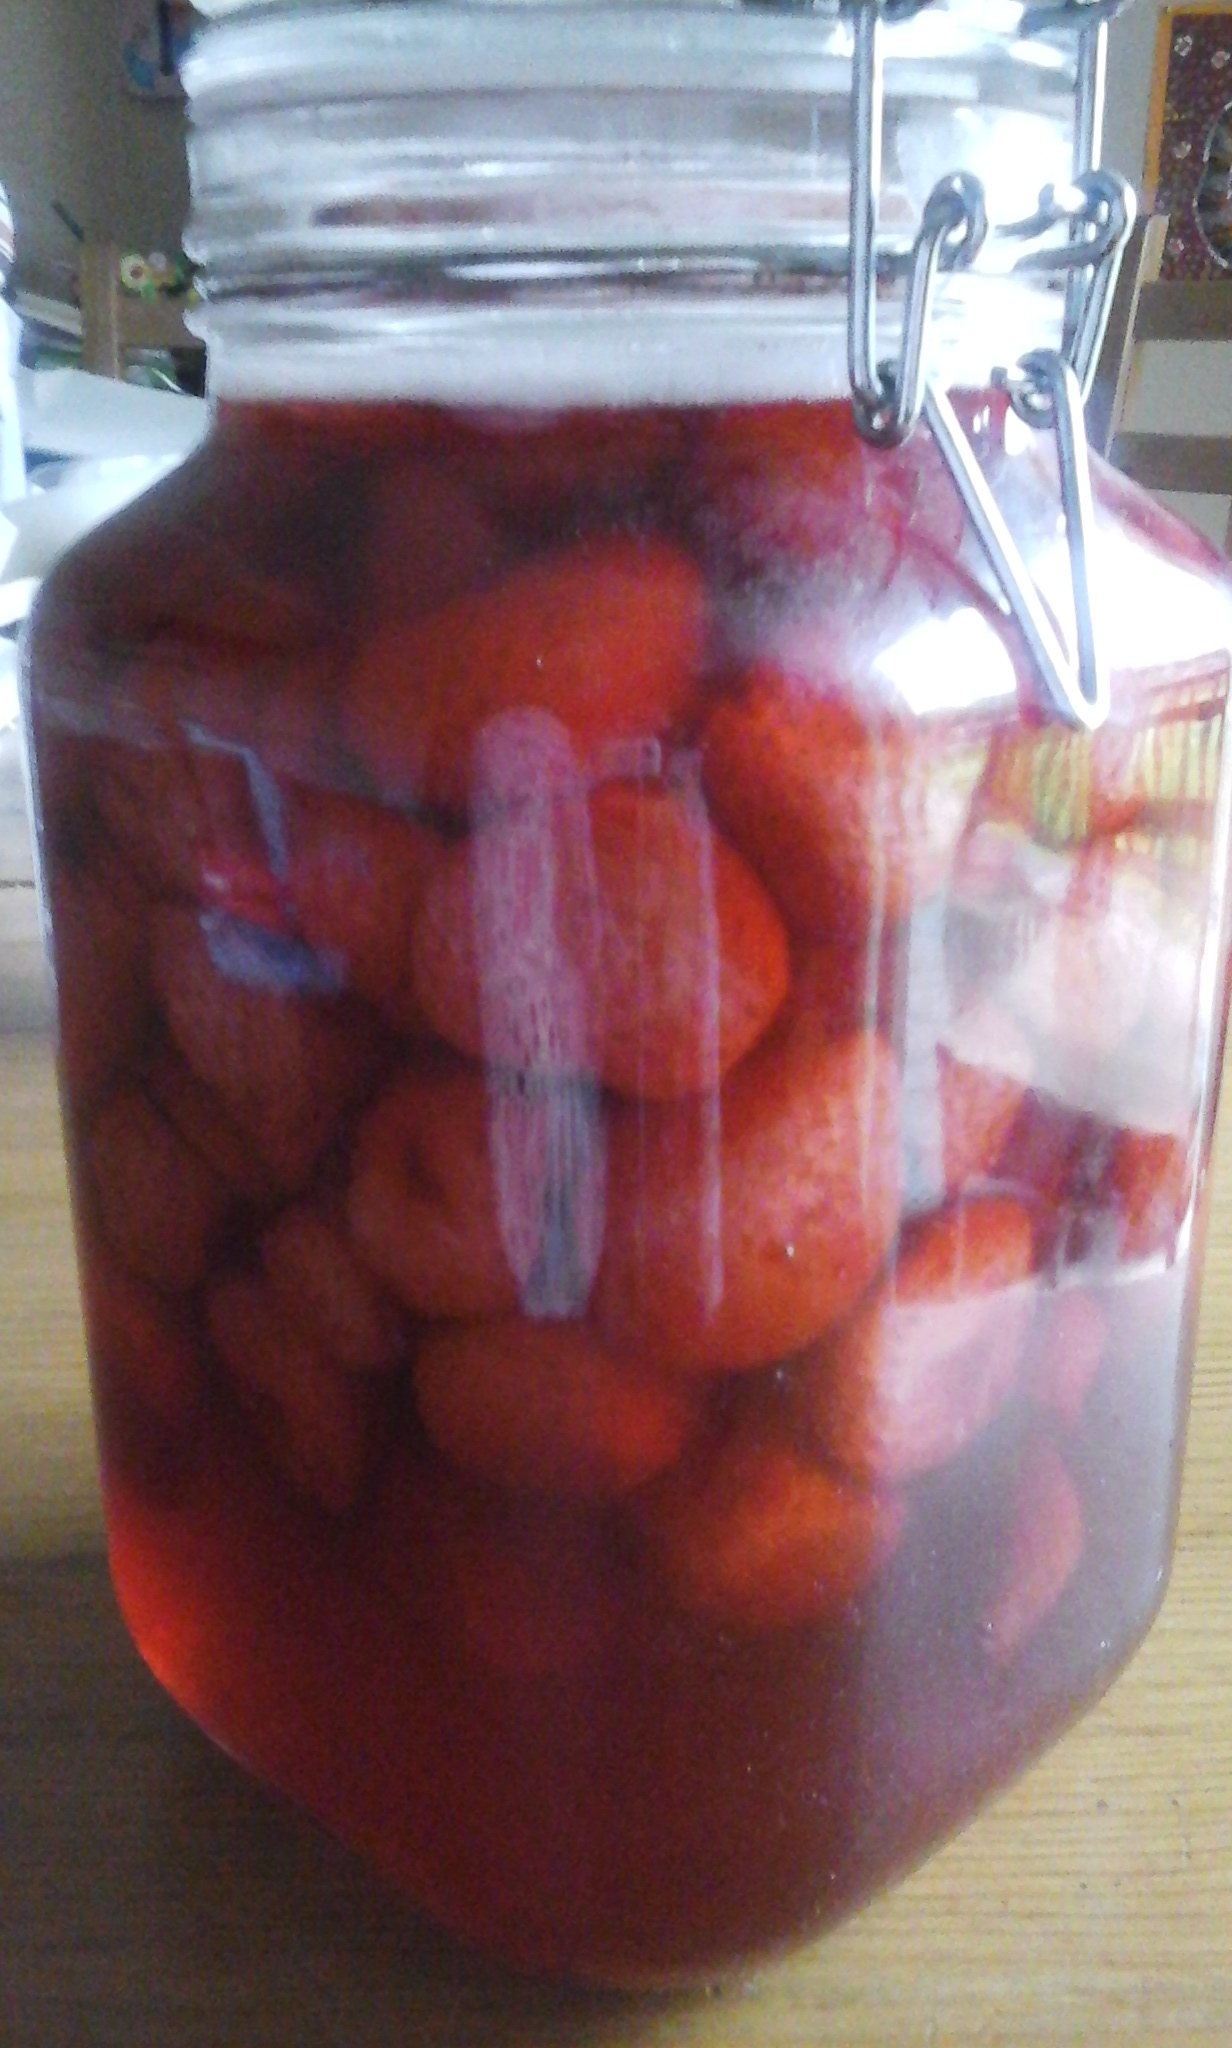
Pancakes made topped with strawberries and devoured, cupcakes made and decorated with strawberries and devoured and generally a couple more punnets just devoured I was left with a couple of punnets that were left over and not going to last too long I decided to bottle some. It’s something we’ve done before, really simple and they lasted well in the bottles. Great to have British strawberries in the winter long after the season is finished.

There are different ways to do this but either way you need an equal weight of sugar and water to make a syrup, sterilised jars and strawberries. That’s it!

Method 1 – Bring sugar and water to the boil for about 5 minutes, make sure the sugar has dissolved. Add the strawberries and simmer for about 10 minutes until soft. Put the strawberries in the pre-sterilised bottle/jar and cover with syrup. Seal and leave to cool.

Method 2 – Pack warmed jars with fruit and cover with syrup solution (as above with sugar dissolved) Leave jars/bottles with lids but not closed/sealed in the oven at 150 degrees C for about an hour.

Bottled strawberries

(You can pre-sterilise jars/bottles by putting them in the oven at about 120-150 degrees C for 10 minutes before hand – no need to do this with method 2 but better if the jars are warmed before you put the fruit in or they might crack when you add the warm/boiling syrup).

When eating don’t throw the syrup away! Either spoon over a pudding (ice cream is great), put in a glass and top up with fizzy water for a lovely drink or use some gelatine and make into strawberry jelly. I’m guessing if you boiled it up you could get it to set as there is probably enough natural pectin but I’ve never tried this. Would love to know if anyone has tried this.

The fruit does rise to the top but that’s normal.

Now, anyone for tennis?

If you liked this – you might like to make waffles to go with your strawberries.

Posted on 2 Comments

Waffling away

Waffles, sugar free

One of my children doesn’t eat much in the way of eggs and I think they’re a great food so quite often we have waffles for breakfast.

Take very little time to make in the waffle maker, doesn’t even matter if the batter is lumpy.

Here’s my healthy recipe.

Ingredients:

3 eggs
knob of melted butter (we use ‘Pure’ dairy free)750ml milk
1 tbsp maple syrup (or honey)
1/2 tsp ground cinnamon
750g wholemeal flour
2 tsp baking powder
pinch of salt

Method:

1 – Mix eggs, milk, butter, syrup together in a large bowl until well combined.
2 – Whisk in cinnamon, flour, baking powder and salt- don’t need to be completely smooth, a few lumps are fine.
3 – Pour just under a ladle full of batter on your waffle maker (actual amount will obviously depend on the size of your maker – trial and error, you’ll soon know how much to use).
4 – Cook as per waffle maker instructions, a couple of minutes each usually.
5 – If you can keep them warm till all are made – impossible in our house, little fingers grab them off the plate as soon as they’re made.

Serve with fresh fruit and maple syrup!

As you can see, Phlicity, my Flamingo fairy helper enjoyed them!

empty plate of waffles!

If you like these you might like Sugar-free chocolate brownies

Posted on 3 Comments

Sugar-free chocolate brownies

sugar-free chocolate brownies davina mccall

Lately I’ve been trying to cut out white flour and refined sugar almost entirely. It’s not easy when I’m nearly 8 months pregnant and craving chocolate, cake, crisps, biscuits, sweets….constantly. So I’ve had to find a few ‘sweet’ alternatives. I found this recipe for sugar-free brownies online by Davina McCall.

Sugar free chocolate brownies

As usual I didn’t quite have all the ingredients to hand and I’ll tell you what I did differently, but essentially the were the same. I would love to try them again and make them gluten free too – maybe tomorrow!?…and yes I did sprinkle a little icing sugar on the top but only a little and wouldn’t have if I wasn’t showing them to you!sugar-free chocolate brownies davina mccall

Ingredients

125g Dark Chocolate (100% cocoa)
100ml milk
100g unsalted butter, plus extra for greasing the tin
175g honey
150g maple syrup
Seeds scraped from ½ split vanilla pod
50g cocoa powder, sieved
3 eggs
150g wholemeal spelt flour
1 tsp baking powder

My variations!

Chocolate – I only had 50% chocolate to hand but would like to try again with darker, my 50% was dairy free though.
Milk – I use oat milk as we’re dairy free, it’s great for baking.
Butter – as we’re dairy free I use Pure sunflower spread in all my baking, it’s perfect, you wouldn’t know the difference – unless you need a ‘buttery’ taste.
Honey – didn’t have much honey left in the cupboard so made up with maple syrup, obviously made it a bit more expensive but yummy!
Spelt flour – didn’t have spelt flour in the cupboard so used ordinary wholemeal flour, figured it was better than white.

Preheat the oven to 190c/170c Fan/Gas 5.

Grease a 30cm x 20cm brownie tin and line it with baking parchment. Leave the paper sticking up at the sides to make it easier to lift the brownie out when it’s cooked.

Method

  1. Put the chocolate, milk, butter, honey, maple syrup and vanilla seeds in a saucepan. Warm over a very gentle heat, stirring regularly, until everything has melted and you have a rich, glossy – looking batter. Remove the pan from the heat and whisk in the cocoa powder.
  2. Allow the mixture to cool for a couple of minutes and then beat in the eggs. Finally add the flour and baking powder. The mixture at this point will look grainier than usual because of the texture of the flour.
  3. Pour the mixture into the prepared tin and bake it in the oven for about 15 minutes until it is just set in the middle but still nice and gooey
  4. Remove the tin from the oven and use the baking paper to help you slide the whole brownie on to a cooling rack as soon as possible so it doesn’t continue to cook
  5. Cut into squares when cool

SERVES: Makes 15 squares
PAN TO PLATE IN: 20
FROM NEW BOOK: 5 Weeks to Sugar-free


This is the first time I’ve made brownies and cooked them perfectly – usually they’re either too soggy in the middle or too hard on the outside because I’ve been paranoid they weren’t cooked right – these were just perfect. I would try them again with spelt flour, or with gluten free flour, or maybe just with ground almonds instead and definitely with darker chocolate and possible dark chocolate chips – or just chunks!

PS If you liked this recipe then you’ll love coconut oil chocolate fudge!

PPS I am a little obsessed with cake, that’s why I became a Flamingo Partner – cos eating cake is part of the job!

Posted on 1 Comment

A tale of two cheesecakes

Dairy free raspberry cheesecake to go with blueberry cheesecake

It was my daughter’s 7th birthday this week and for her ‘cake’ she wanted a blueberry cheesecake, her favourite dessert. As two of us in the family are dairy free I also had to make a cheeseless cheesecake, so here are my recipes for both. These are adapted from Nigella Lawson’s recipe in ‘Nigella Express‘. I’m not sure the cheeseless one is the best dairy free cheesecake and I would love suggestions on how to improve it but it was edible and a pretty good alternative.

‘Real’ cheesecake

Ingredients

100g digestive biscuits
25g ginger biscuits
300g cream cheese
60g icing sugar
1tsp vanilla extract
1/2 tsp lemon juice
250ml double cream
Blueberry conserve and fresh blueberries for topping

Method

Whiz the biscuits in a food processor until beginning to turn to crumbs (don’t whizz too hard!) then add the butter and whiz again until the mixture clumps.

Press the mixture into a 20cm springform tin, press a little up the sides to form a slight ridge. (As you can see from the picture I didn’t have two springform tins so I used a heart shaped silicon cake mould for this cheesecake and didn’t try and take it out of it before serving, looked pretty enough in the mould)

Beat together the cream cheese, icing sugar, vanilla extract and lemon juice in a bowl until smooth.

Lightly whip the double cream and fold it into the cream cheese mixture.

Spoon cheesecake filling on top of biscuit base and smooth off. Put in the fridge overnight of for at least 3 hours.

When you are ready to serve, unmould (or not!) and spread blueberry conserve over the top and sprinkle with fresh blueberries.20151007_151857

Serves 6-8 (if you don’t like it as much as my husband does!)

Cheeseless cheesecake

Ingredients

100g digestive biscuits (make sure they are dairy free, most supermarket own are)
25g ginger biscuits (again make sure they are dairy free, most supermarket own are)
255g soya cheddar-like cheese spread
60g icing sugar
1tsp vanilla extract
1/2 tsp lemon juice
250ml soya yoghurt with almond
For topping I used 1 x 284 jar St Dalfour Rhapsodie de Fruit Raspberry Spread and some fresh raspberries.Dairy free raspberry cheesecake

Method – exactly the same as for cheesecake substituting the cream cheese for the cheese spread and beating the yoghurt in with this mix (it’s not going to whip!).

I find the soya cheese spread revolting on its own so I used the almond plain yoghurt to add flavour and used a whole jar of raspberry spread and lots of fresh raspberries again to counteract the cheese spread. In the picture I had tried to make the raspberry spread look pretty but I ended up spreading it all over and adding fresh raspberries, much like I’d done with the blueberry – was much better but I forgot to take a photo! I think it worked (made a previous version of this without so much added flavour and couldn’t get past the horrible cheese spread taste!)

You can of course use whatever fruit topping you like, these ones worked for us.

I’d love some comments on how to make a cheeseless cheesecake that sets, this goes slightly firm but nothing like a real cheesecake. I use that particular cheesespread as it’s the only one available locally, there may be alternatives near you, and again I’d love to know what works for you.

Posted on 9 Comments

Coconut Oil Chocolate Fudge

I found this Coconut Oil Fudge recipe and made it for my butterfly tea party. A few people have since asked for the recipe so here it is. I used a jar of coconut oil (costs about £5 in our local deli) and a little honey but I think it would have been sweet enough without any honey or syrup – but you can taste to see as you make it.

Coconut Oil Chocolate Fudge MARCH 13, 2015 BY THE COCONUT MAMA

Super metabolism boosting coconut oil fudge recipe made healthy with natural ingredients like coconut oil, cocoa powder, raw honey (stevia can be used if you prefer) and vanilla extract. That’s it! No corn syrup, marshmallows, frosting or chocolate chips needed. Enjoy!

Coconut and chocolate is a match made in heaven! They pair well together in many of my popular recipes like my homemade chocolate bar recipe, chocolate coconut butter bars recipe, homemade “Mounds” candy recipe, homemade junior mints recipe and my magic hard shell recipe.

I’ve been working on this homemade fudge recipe for months. I wanted a simple recipe that could be tweaked easily for special dietary needs. I used raw honey to sweeten our fudge but other natural sweeteners can easily be substituted in its place. Raw cacao powder can be used in place of regular cocoa powder and expeller pressed coconut oil can be used in place of virgin coconut oil (some do better with expeller pressed because it’s easier to digest). Add a few drops of Young Living peppermint essential oil or 1/2 teaspoon of peppermint extract for delicious mouth-watering peppermint fudge.

COFudge

Ingredients

1/4 cup Coconut Oil

1/4 cup Cocoa Powder

1/2 Teaspoon Vanilla Extract

Raw Honey (or other natural sweetener like maple syrup or stevia)

Pinch of Sea Salt

Optional: 2 Drops Peppermint Essential Oil

Directions

1. Measure 1/4 cup of coconut oil and scoop it out into a mixing bowl. Whip the coconut oil with a stand or hand mixer until it’s light and fluffy (like this).  Note: If your coconut oil is room temperature and already liquid you can skip this step.

2. Mix the whipped (or melted if you live in warmer climate) coconut oil, cocoa powder, vanilla and salt together. Mix well and slowly add honey or sweetener of choice. Taste as you go to make sure you don’t over sweeten your fudge. Mix in 2 drops of peppermint essential oil if using.

3. Pour fudge into a 9×5 inch pan  (this is a bread size pan). Spread fudge evenly cover the pan with a lid or plastic wrap. Refrigerate until fudge is set and hard, about 4 hours.

4. Cut fudge into small squares and serve.

via Coconut Oil Fudge – The Coconut Mama.

If you like this, you might also like A Tale of Two Cheesecakes